

Hey there, fellow parents and caregivers! I'm super stoked to share with you all about how to put on a baby carrier wrap. As a supplier of these amazing baby carriers, I've seen firsthand the joy and convenience they bring to parents and the comfort they offer to little ones. So, let's dive right in!
Why a Baby Carrier Wrap?
Before we get into the nitty - gritty of putting it on, let me quickly tell you why a baby carrier wrap is such a great choice. It's all about that close, snug fit that mimics the feeling of being in the womb for your baby. This can help soothe them, reduce crying, and promote better sleep. For you, it means having your hands free to do other things while keeping your baby close. You can run errands, cook, or just take a stroll around the neighborhood with ease.
Choosing the Right Wrap
First things first, you need to pick the right baby carrier wrap. We offer a wide range of options, like the Hook and Loop Design Baby Sling. This one's got a really cool hook and loop design that makes it super easy to adjust and put on. And if you're looking for a more comprehensive package, check out our Hands Free Baby Carrier Package. It's got everything you need to carry your baby comfortably. Also, for those times when you want a bit more support, our Multi - Functional Baby Waist Stool is a great addition.
Preparing the Wrap
Alright, once you've got your wrap, it's time to get it ready. Lay it out flat on a clean surface. Make sure it's not twisted or wrinkled. If it's a new wrap, give it a good shake to loosen it up a bit. Some wraps might need a bit of breaking - in, so don't be surprised if it feels a bit stiff at first.
Putting on the Wrap
Now, here's how you put it on. Stand up straight and hold the middle of the wrap in front of your body, right at your belly button level. Let the two ends hang down evenly on either side.
Next, take the left end of the wrap and bring it around your back, across your right shoulder. Do the same with the right end, bringing it around your back and across your left shoulder. The two ends should cross in the middle of your back.
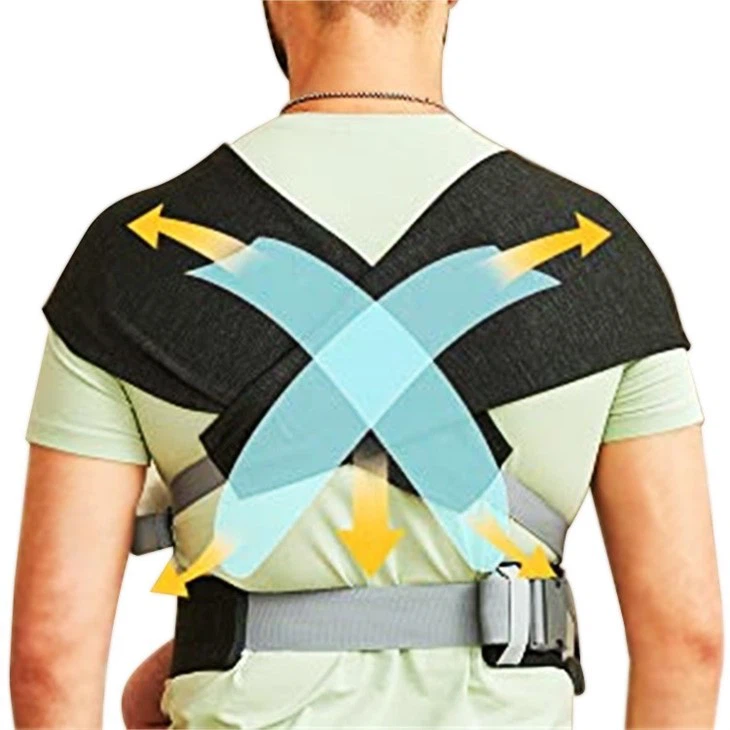

After that, bring the ends back to the front of your body. You can adjust the length so that it's not too tight or too loose. A good rule of thumb is that you should be able to fit two fingers between the wrap and your body.
Now, tie the two ends together in a double knot at your belly button. Make sure it's tight enough so that the wrap stays in place, but not so tight that it's uncomfortable. If you're not sure about the knot, you can practice a few times on a chair or something before putting your baby in.
Placing the Baby in the Wrap
Once the wrap is on you, it's time to put your baby in. Sit down on a comfortable surface, like a couch or a chair. Gently pick up your baby and place them in the middle of the wrap, facing you. Their head should be supported by the fabric, and their legs should be in a natural, frog - like position.
Then, take the fabric on either side of your baby and bring it up over their shoulders. Make sure it's covering them well and that they're nice and snug. You can adjust the fabric to make sure your baby's neck is straight and their face is visible.
Finally, tuck the excess fabric under your baby's bottom to give them some extra support. You want to make sure they're secure but also comfortable.
Adjusting for Comfort
After you've placed your baby in the wrap, it's important to make some final adjustments. Check the tightness of the wrap around your baby. It should be snug enough to hold them in place but not so tight that it restricts their movement. You should be able to fit your hand between your baby and the wrap.
Also, make sure your baby's legs are in a healthy position. Their knees should be higher than their bottom, and their hips should be in a natural, spread - out position. This helps prevent hip problems as they grow.
Check your own comfort too. If the wrap is digging into your shoulders or back, adjust it a bit. You might need to loosen or tighten certain parts to find the perfect fit.
Tips and Tricks
- Practice makes perfect: Don't worry if you don't get it right the first time. It might take a few tries to get the hang of putting on the wrap and placing your baby in it. Just keep practicing, and you'll be a pro in no time.
- Use a mirror: If you're having trouble seeing what you're doing, use a mirror. It can help you make sure the wrap is on correctly and that your baby is positioned well.
- Get help: If you're still struggling, ask a friend or family member to give you a hand. They might be able to offer some tips or just help you with the process.
Safety First
Safety is always the number one priority when using a baby carrier wrap. Make sure the wrap is in good condition, with no frayed edges or loose threads. Check the knots regularly to make sure they're secure.
Never leave your baby unattended in the wrap. And always follow the manufacturer's instructions for use and weight limits.
Conclusion
So there you have it, folks! That's how you put on a baby carrier wrap. It might seem a bit complicated at first, but once you get the hang of it, it's a breeze. And the benefits for both you and your baby are amazing.
If you're interested in purchasing a high - quality baby carrier wrap or any of our other baby products, we'd love to hear from you. Whether you're a retailer looking to stock our products or a parent wanting to buy one for yourself, we're here to help. Just reach out to us, and we can start discussing your needs.
References
- General knowledge from years of experience as a baby carrier wrap supplier.
- Safety guidelines from baby product industry standards.


